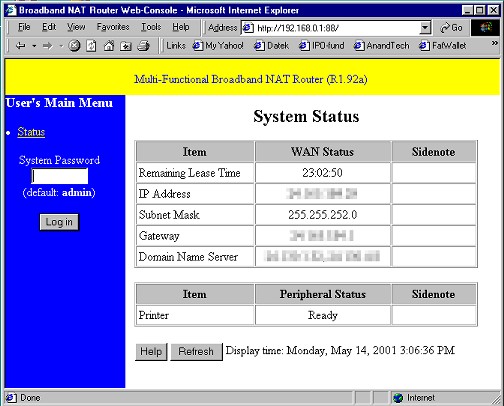
Shot of original admin page:
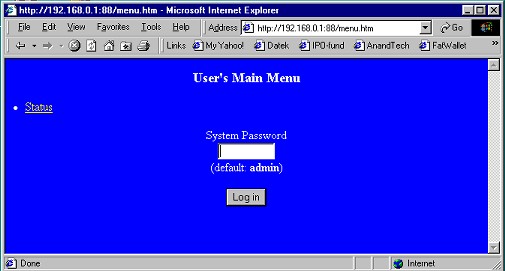
Shot of "admin trick" page:
Here are some tips in no particular order that come up in the forum that we have solutions for. In these examples, we'll assume the following:
Here is What I've got so far (last updated 05/14/01):
I've posted most of these solutions on www.practicallynetworked.com, but their forum software sucks... Posts get lost, the forum changes it's version/look, other posts never make it, etc. I know i'm not the only one who thinks that practicallynetworked uses THE worst forum software ever!!!! Some of these solutions have come from other users on practicallynetworked too. I'll try to give credit where credit is due, but the main point of this page is to help people and use it as a reference point since our posts keep getting lost...
Having said that... A few questions get asked over-and-over on the forums. I've posted solutions over-and-over too. BUT, the forum continuously looses my posts... VERY frustrating...
So, here are a few tricks/solutions/workarounds to the SMC/AMIT routers. This page is very informal, and a quick-fix. I've got a BS in Electical Engineering (minors in computer science and mathematics), and am an IS manager for a Chemical Analysis company. I'm NOT a speller nor was I ever an english major! heeh! Perhaps sometime i'll put more effort into this, spell checker, etc., but more than likely not! I'd rather put more effort into the routers and their issues! heeh! -jeremy
The "admin trick" refers to accessing the router's administation pages while trying to prevent the router from locking up. The AMIT based routers have a tendancy to lockup (or timeout) while accessing the router's configuration pages typically requiring a reboot of the router by it's power switch. A lot of times, it freaks out while trying to load one of the 3 framed pages. Many times you can avoid this by accessing the configuration pages in a round-about way. By visiting ONE of the frames rather than the entire administrative page, you can help to avoid the lockup or timeout. To access the admin pages in this manner, add the suffix /menu.htm to the url you use to access your administration pages. It should look something like http://192.168.xxx.yyy:88/menu.htm In my setup it would be:
The pages will look the same, except broken out rather than contained in frames. Not as clean as the original
framed pages, but better than a lockup!
Shot of original admin page:
Shot of "admin trick" page:
Here is what I posted a while back on alt.icq (under my newsgroup alias 'So Polite' to avoid spam)
and on the practicallynetworked:
hi all! 'So Polite' here again... i decided to post the fix for you now that
i have played w/ it for a while... icq's web site still says it isn't
possible to receive files (or chat or basically establish a direct
connection) behind hardware firewalls using NAT.. i'm here to tell you that
you can (and i do..) WITHOUT DMZing it...
at work i use a cisco router w/ dsl and win2k. at home i use a smc barrade
router/switch and win98se. same configurations on both ends (meaning same
configs on the routers and OS's), just a little different on how you do
those configurations. i'll be real nice and spell it out for this setup so
hopefully someone will benefit from it!
here are the steps:
WHAT IT REQUIRES - brief overview
SETUP ICQ - icq settings
CISCO 1400 EXAMPLE - how to map ports on a cisco 1400 router
SMC BARRACADE EXAMPLE - how to map ports on a smc barracade router
GENERAL NOTES - self explanitory!
WHAT IT REQUIRES:
you have to map 5 ports to the machine(s) you want to receive files on... 4
doesn't work, 5 does. if you use less than 5, you'll get a 'can't send files
on listening tcp port' or something like that. i can't receive 2 files at
once, i'd imagine it would take 10 port maps. since this wasn't of interest
to me, i didn't test it out... i only need one direct connection at a
time... then you tell icq that you are using a firewall, and those specific
5 mapped ports. then, enjoy! you can receive files! (or chat, or whatever)
SETUP ICQ:
in the icq configuration (the same for win98 or win2k) (oh, and i'm using
the 2000b version) open icq, click the ICQ button, and choose preferences.
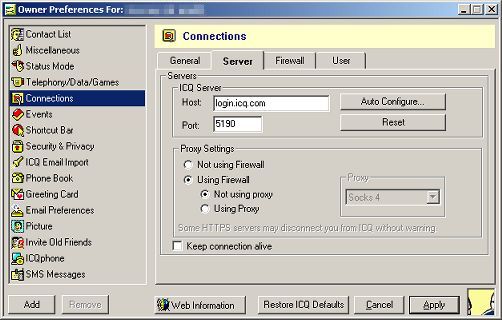
click the 'connections' selection toward the left, then the 'server' tab.
choose 'using a firewall' and 'not using a proxy'.
click the 'user' tab, and
choose 'not using a proxy' and 'use the following tcp listen port for
incoming event'. pick 5 ports in a row that you want to use (remember them
as you will be mapping those ports latter...) for this example i'll choose
12000-12004. keep the numbers that you choose high so that there is less
likely of a chance that you will mess up another program. so since i chose
12000-12004, i would enter 'from 12000' and 'to 120045'.
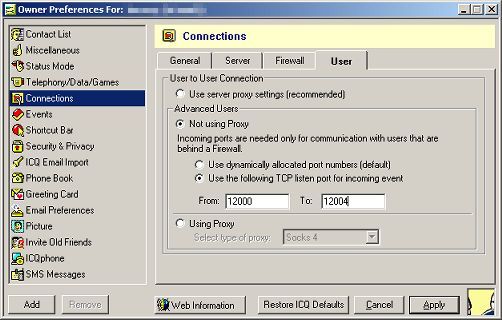
click 'apply' and
you will then have to restart icq for the changes to go into effect. you are
now done. you basically just told icq that you are using a firewall w/out a
proxy, and forced icq into using 5 ports instead of their default million
random ports... this is what lets you use icq behind a proxy w/out DMXing
it... (taking out the randomness that is...)
CISCO 1400 EXAMPLE:
the cisco 1400 is basically a router designed for dsl use. it is pretty high
end as 'dsl modems' go and has a lot of firewall capabilities. i do
configurations from the command prompt, and will assume that you know how to
do that. if not, you're on yer own, you'll have to look that up! but
assuming you know how to set up yer cisco from the command prompt, here is
how you map the 5 ports to the private ip 192.168.0.100 (you would pick the
private ip address of whichever computer you want to use icq from) (this is
all one line below):
ip nat inside source static tcp 192.168.0.100 12000 63.63.63.63 12000
extendable
all you have to do is replace 192.168.0.100 w/ yer private ip address, and
63.63.63.63 w/ yer public ip address (of the cisco). it tells the cisco that
anything coming to the cisco (63.63.63.63) on port 12000, send it to
192.168.0.100 on port 12000. repeat this w/ 12001-12004 and you will have
mapped all 5 ports. and in case you are wondering, 63.63.63.63 is NOT my ip
address! heehee! write mem yer changes, and you are all set to receive
files! woohoo!
SMC BARRACADE EXAMPLE:
i own a smc 4 port 10/100 barracade router/switch at home. this is a cable
modem or dsl router w/ 4 10/100 switched ports built in. i like it a lot and
it also has a analog modem port AND print server built in! i think they are
going for about $100 online after rebate. they only think i would replace it
w/ would be their 8 port version!! at any rate, i think it too has a command
line interface, but for it i just use the web configuration interface. so,
lets map our 5 ports on the barracade...
1) go to the router's configuration page via a browser. it would look
something like http://192.168.0.1 or whatever you have set yer barracade's
ip address to.
2) log in to the router in the left pane (Default password is "admin" w/out
the quotes.
3) after you log in, click the 'virtual server' link on the left.
4) you now see a few fields replicated 10 times. lets map a port.. on any
one of the ID's, fill in the 'service port' w/ '12000', the 'Server IP' w/
'192.168.0.10', and check the 'enable' box. you have just told the barracade
to send all traffic from port 12000 to the private ip address (of the icq
computer) 192.168.0.10.
5) repeat step 4 w/ the other ports (12001-12004)
6) click the 'save' button down below, and then 'reboot' yer router w/ the
'reboot' button.
congrats, you are all ready to receive files!!!
GENERAL NOTES:
well, i hope this novel is usefull to someone. it took my friend and i about
20 minutes to setup what icq says you can't... (or at least at the time says
you can't.. wouldn't be surprised if they say you can now.. or perhaps after
reading this? heehee!) as i said, this will let me make 1 recieve connection
at a time.. if you want more, you'll probably have to map 5 more ports. but
i havn't tried it, i have no need for it. enjoy!